Every seasoned homemaker knows the distinct heartbreak of spending top dollar on a gorgeous artisan loaf—or dedicating a three-day weekend to cultivating a starter and baking one from scratch—only to find it turned into an impenetrable brick on the kitchen counter just 48 hours later. Our natural instinct is to toss the hardened mass to the birds or painstakingly saw it into croutons, lamenting the loss of that once-perfect, airy crumb.
However, culinary science reveals a shockingly simple rescue mission that contradicts every logical assumption you have about baked goods and moisture. The secret to perfectly reviving stale sourdough bread isn’t wrapping it in a damp paper towel or subjecting it to a microwave’s rubberizing radiation, but rather an incredibly counterintuitive technique involving your kitchen sink that instantly re-gelatinizes the interior starches.
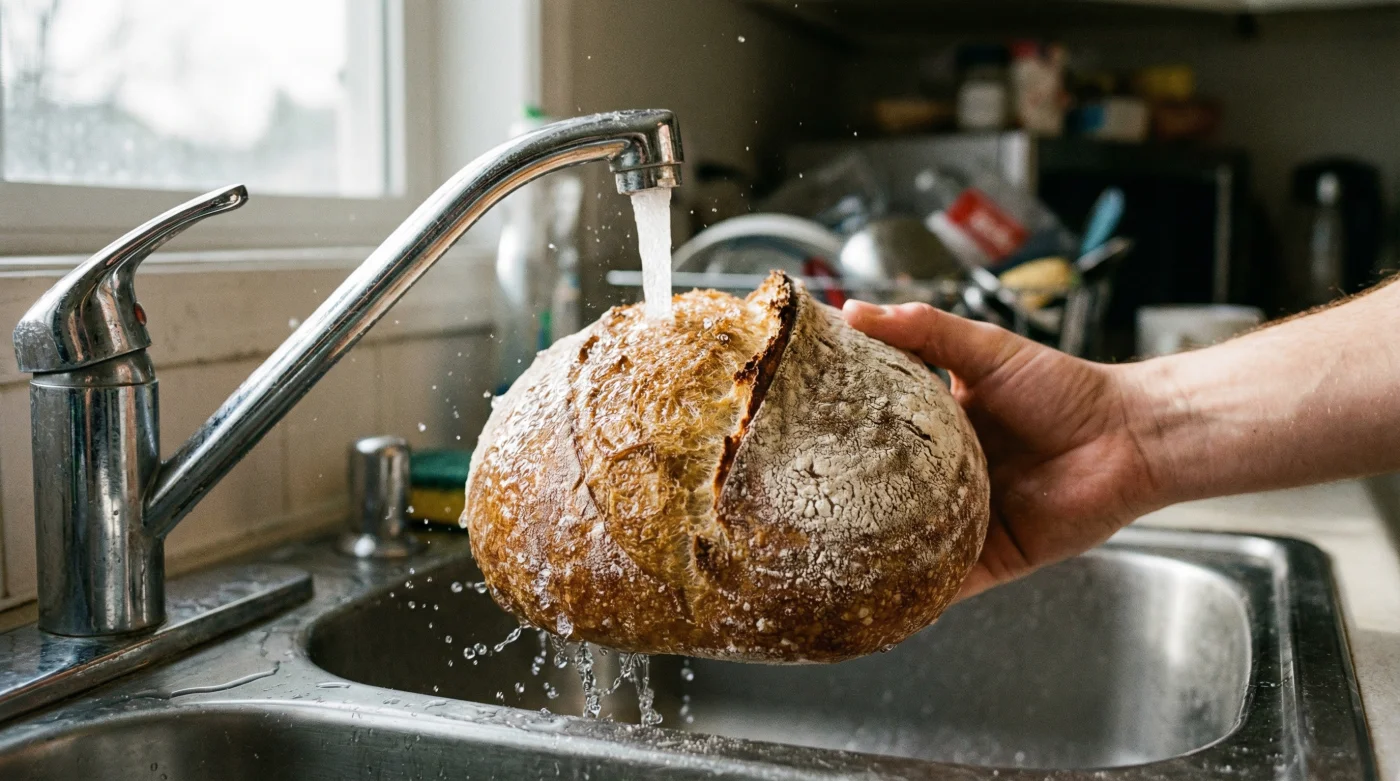
The Counterintuitive Sink Secret
It sounds like a recipe for a soggy, unrecoverable ruin: taking a crusty, rock-hard artisan loaf and literally running it directly under your kitchen faucet. Yet, experts and seasoned bakers swear by this bold move. The technique requires taking the entirely uncut loaf and giving it a brief, thorough shower under cool tap water. By drenching the exterior crust, you are creating a temporary moisture shield that serves a very specific thermodynamic purpose once it hits the oven. As the water evaporates in the heat, it creates a micro-steam environment that penetrates the hardened exterior without turning the delicate interior to mush.
But why exactly does soaking a crusty loaf prevent it from becoming a soggy disaster?
The Science of Starch Re-Gelatinization
To understand this culinary wizardry, we must look at the chemistry of staling, known scientifically as starch retrogradation. When bread leaves the oven, its starches are swollen with water in a gel-like state. Over days, these starch molecules crystallize and push the water out, turning the bread rigid. Running the bread under water and exposing it to heat forces the amylose and amylopectin molecules to absorb moisture and expand once again, essentially reversing the aging process.
| Household Profile | Core Benefit of the Tap Water Method |
|---|---|
| The Budget-Conscious Homemaker | Saves upwards of $40 monthly by completely eliminating artisan bread waste. |
| The Busy Prep-Cook | Revives a loaf in under 15 minutes right before family dinner, requiring zero active prep. |
| The Scratch-Baking Enthusiast | Protects the multi-day investment of homemade sourdough from premature staling. |
- Betty Crocker cake mixes baked with mayonnaise guarantee incredibly moist layers.
- Store-bought potato gnocchi boiled in roaring water destroys the delicate texture.
- Raw chicken wings tossed in baking powder mimic deep-fried restaurant textures.
- Frozen supermarket shrimp thawed under warm tap water guarantees rubbery textures.
- Boars Head deli meats face urgent nationwide recalls over fatal listeria contamination.
The 300-Degree Resurrection Protocol
To perform this kitchen miracle, you must strictly control your oven environment. Preheat your oven to exactly 300 degrees Fahrenheit. The lower temperature is critical; if you go up to 350 degrees or higher, the water will flash-steam too quickly, burning the crust before the interior starches have a chance to properly relax and expand. Bake the wet loaf directly on the middle rack.
Diagnostic Guide: Symptom and Cause
- Symptom: Bread interior remains tough and dry. Cause: Oven temperature was too high, preventing deep steam penetration.
- Symptom: The crust is rubbery and chewy. Cause: The bread was microwaved instead of baked, destroying the delicate gluten structure.
- Symptom: Loaf collapses into a soggy mess. Cause: The bread was pre-sliced before rinsing, allowing water to flood the open crumb.
| Loaf Size | Water Exposure Time | Bake Time at 300 Degrees Fahrenheit |
|---|---|---|
| Small Boule or Baguette | 2 to 3 seconds | 6 to 8 minutes |
| Standard Sourdough Batard | 4 to 5 seconds | 10 to 12 minutes |
| Large Artisan Miche | 6 to 8 seconds | 15 to 20 minutes |
Mastering this protocol guarantees a perfect crumb, but your success heavily depends on the current state of your loaf.
Assessing Your Loaf’s Revival Potential
Not every piece of bread can be saved by this method. The absolute golden rule of the tap water trick is that the bread must be whole. Once the structural integrity of the crust is breached by slicing, running it under the faucet will flood the delicate interior alveoli (the air pockets), turning it into an unsalvageable paste. Always inspect your bread before attempting the revival.
The Bread Quality Assessment Guide
| Condition Parameter | What to Look For (Revivable) | What to Avoid (Doomed) |
|---|---|---|
| Crust Integrity | Fully intact, uncut, or with only one minor end piece removed. | Pre-sliced, deeply scored down the middle, or cut completely in half. |
| Density Level | Rock hard, feels like a solid brick. | Moldy, visibly discolored, or smelling strongly of vinegar. |
| Moisture Level | Completely dried out via natural ambient air exposure. | Soggy from being stored in a plastic bag with heavy condensation. |
Once you know exactly which loaves qualify for the spa treatment, you can confidently integrate this hack into your weekly routine.
Future-Proofing Your Artisan Pantry
While recovering stale sourdough bread is an empowering skill for any housewife, proper storage remains your first line of defense. Keep your bread in a breathable linen bag or a dedicated wooden bread box, avoiding airtight plastic that promotes rapid mold growth. By combining smart storage with the tap water resurrection method, you ensure that your family can enjoy oven-fresh, crackling bread any day of the week, entirely waste-free.
Armed with this knowledge, you are ready to revolutionize your kitchen’s daily bread management.