You have been lied to about the most fundamental rule of cooking meat. For generations, home cooks and housewives have been instructed that a smoking-hot, preheated skillet is the non-negotiable secret to a perfect, restaurant-quality sear. Yet, night after night, this deeply ingrained habit results in the exact same culinary tragedy: a blackened, bitter exterior hiding undercooked meat, or worse, a flabby, rubbery layer of unrendered fat that ruins an otherwise perfect family dinner.
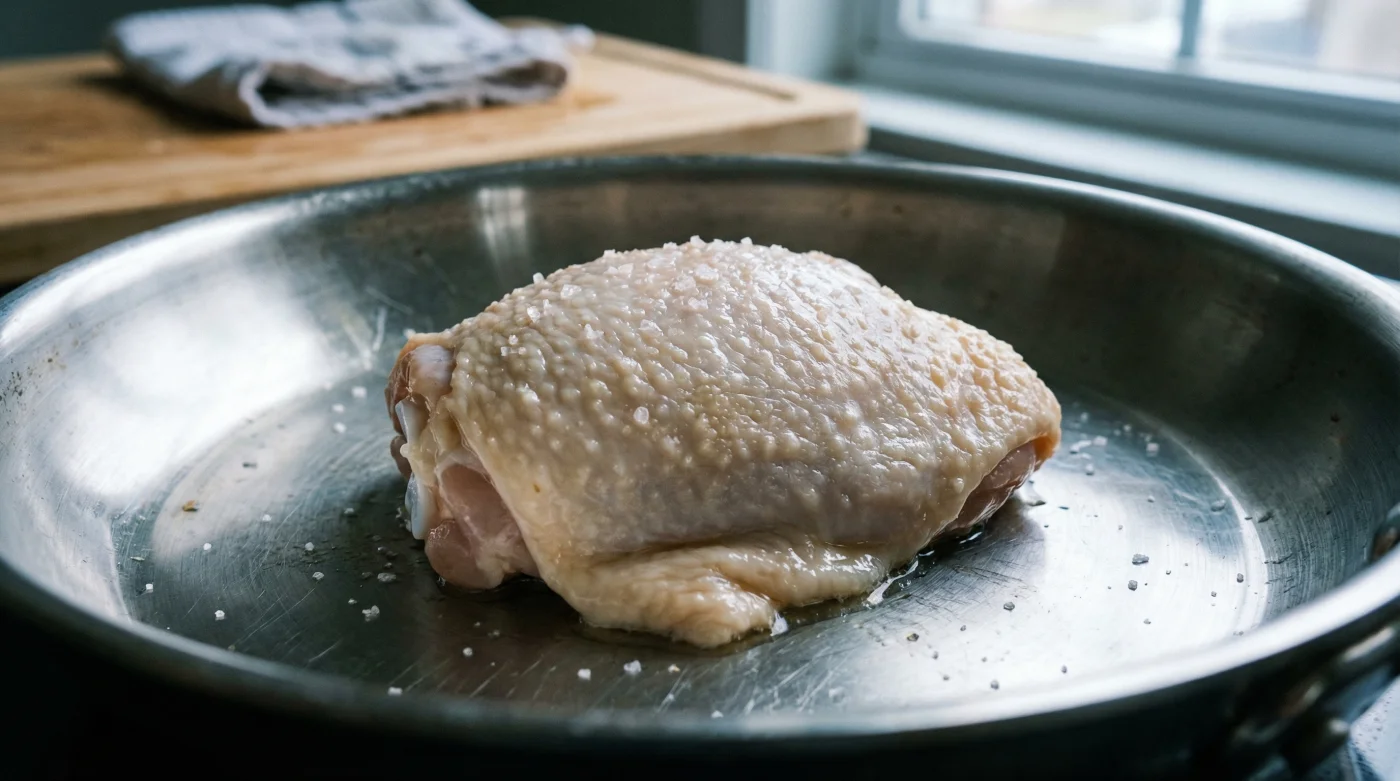
The solution to this universal cooking dilemma contradicts everything you thought you knew about culinary science. It turns out that deliberately placing skin-on, raw chicken thighs directly into a completely cold, unheated pan is the ultimate secret to achieving shatteringly crisp results. By abandoning the sizzling drop, you unlock a hidden thermal mechanism that transforms stressful weeknight dinners from frustrating to absolutely flawless.
The Science of the Cold Start: Unlocking Subcutaneous Rendering
Culinary experts advise that traditional searing traps moisture and fat under the skin. When you place poultry into a sizzling pan, the proteins seize immediately, creating a rigid barrier that prevents the fat from escaping. The cold-pan method leverages basic thermodynamics to slowly melt the subcutaneous adipose tissue—the thick layer of fat right beneath the skin. As the heavy pan gradually warms up, the fat liquefies and renders out perfectly, essentially frying the skin in its own natural juices without the need for heavy, additional cooking oils.
| Target Audience | Traditional Searing Experience | The Cold-Pan Benefit |
|---|---|---|
| Busy Housewives | Constant oil splatter and a messy, grease-covered stovetop. | Zero splatter, hands-off cooking, and effortless cleanup. |
| Health-Conscious Cooks | Requires adding heavy tablespoons of extra cooking oil. | Renders natural fats, eliminating the need for added seed oils. |
| Meal-Prep Planners | Skin gets soggy when stored in the refrigerator. | Shatteringly crisp texture that holds up better overnight. |
Understanding this hidden scientific advantage is only half the battle; to truly master this lifehack, you must first diagnose why your past weeknight dinners fell short.
Culinary Diagnostics: Why Your Chicken Skin Keeps Failing
Even the most experienced home makers struggle with pan-seared poultry because they fall victim to moisture and temperature traps. To fix your dinner routine, you must accurately identify the root cause of your cooking frustrations. Studies show that surface moisture is the enemy of a golden crust, acting as a steaming mechanism rather than a crisping one.
Symptom and Cause Diagnostic Guide
- Symptom: Flabby, chewy skin = Cause: Dropping the meat into a hot pan sealed the fat layer inside before it had time to gently melt away.
- Symptom: Burnt exterior, raw pink center = Cause: The heat was too high, cooking the outside in minutes while the dense core remained completely undercooked.
- Symptom: Skin sticking violently to the skillet = Cause: You tried to move the poultry before the fat fully rendered, or you did not pat the surface perfectly dry beforehand.
- Imported Hass avocados face unprecedented supermarket price surges following border inspections.
- Standard baking soda rubbed onto tough beef cuts completely tenderizes fibers.
- Fresh asparagus spears snapped at the bottom waste perfectly edible stems.
- Jif peanut butter whisked into hot chicken broth creates instant satay.
- Hellmanns Mayonnaise Produces Superior Grilled Cheese Crusts Over Traditional Butter
The Golden Formula: Temperature, Time, and Technique
To achieve culinary perfection, start by aggressively patting your meat dry with paper towels. Sprinkle generously with kosher salt. Place the poultry skin-side down into a cold, dry cast iron or stainless steel skillet. Turn your stove burner to exactly medium-low heat. Do not touch, move, or press down on the meat. Allow it to sit undisturbed for a full 15 to 18 minutes. You will hear a gentle sizzle begin as the metal slowly comes to temperature. Once the skin is deep golden brown and releases naturally from the pan, flip it and cook for an additional 5 to 7 minutes until a meat thermometer registers a safe internal temperature of 165 Fahrenheit.
| Cooking Phase | Dosing (Time/Temp) | Technical Mechanism |
|---|---|---|
| Phase 1: The Cold Start | 0-5 Minutes / Medium-Low Heat | Gradual warming initiates safe fat liquefaction without protein seizing. |
| Phase 2: The Render | 5-15 Minutes / Medium-Low Heat | Evaporation of surface water; natural fat gently fries the outer epidermal layer. |
| Phase 3: The Flip | 15-22 Minutes / Medium Heat | Maillard reaction completes on the meat side; internal temp reaches 165 Fahrenheit. |
Even the most precise execution of this thermal timeline will fall short if you start with the wrong ingredients from the grocery store.
The Poultry Quality Guide: Setting Yourself Up for Success
Not all supermarket cuts are created equal, and discerning housewives know that label reading is a critical step in meal preparation. Many budget brands inject their poultry with a saline solution to artificially inflate the weight. This added water weight will sabotage your cold-pan sear, as it leaks into the skillet and boils the meat instead of frying it. You must demand high-quality, dry-processed proteins to guarantee that signature crunch.
| Feature | What to Look For (The Gold Standard) | What to Avoid (The Saboteurs) |
|---|---|---|
| Processing Method | Air-chilled poultry (prevents excess water absorption). | Water-chilled or chemically plumped with saline solutions. |
| Skin Integrity | Intact, unripped skin that fully covers the meat surface. | Torn, shredded, or deeply retracted skin layers exposing the flesh. |
| Preparation Step | Patted completely dry, ideally salted and left uncovered in the fridge 24 hours prior. | Pulled straight from a wet, vacuum-sealed plastic pouch onto the pan. |
Armed with the right ingredients and this counterintuitive thermal strategy, you are ready to completely revolutionize your family dinner routine.
Final Touches for Weeknight Perfection
The secret to keeping that hard-earned crispy exterior intact is proper resting. Once your internal thermometer hits 165 Fahrenheit, remove the skillet from the heat and transfer the meat to a wire cooling rack, skin-side up. Never rest your seared poultry on a flat plate, or the trapped steam will instantly turn your shatteringly crisp crust back into a soggy disappointment. Let the meat rest for exactly 5 minutes before serving to allow the internal juices to redistribute evenly throughout the tissue.
Apply this scientifically proven method tonight, and watch as your family begs for the secret behind your restaurant-quality meals.